OEM Replacement Coils: Repair or Replace

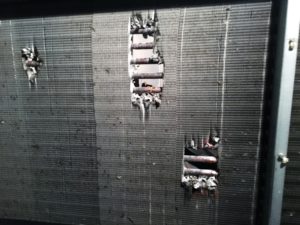
When considering OEM replacement coils, there are multiple reasons why coils can fail prematurely. Sometimes, OEM Coils simply freeze and can never be repaired. Other times, the coil was selected incorrectly, which in turn, made the coil significantly underperform. Many times, there is substantial corrosion or something else in the system that causes the coil to fail. However, most coils, when selected correctly, and in systems that are properly maintained, can last anywhere from 10-30 years!  10-30 years is also a pretty wide range, and there are many variables in how long you can expect a coil to perform. Factors, such as ongoing maintenance, air quality, and water/steam quality all have an effect on a coil’s lifespan.
OEM Replacement Coils

Reasons Why Coils Fail Of Old Age

  • While the coil’s tubes are considered the primary surface, 70% of all coil performance is performed by the finned area on a coil, which is known as the secondary surface. The fin/tube bond is easily the most important manufacturing feature in any coil. Without the bond between the tubes and fins, the coil could never properly function. Like all things however, over time the fin/tube bond becomes less efficient with constant expansion and contraction. While the construction of the coil, as well as the fin collars, does not allow the fins on the coil to move, that fin/tube bond naturally weakens a coil’s life over time after installation. Because of this, it is not a stretch to say that a coil is easily 30% less efficient after (20) years.
  • Cleaning coils often pushes dirt to the center of the coil, and this occurs even more so on wet cooling coils. Just remember that coils can become great air filters if not properly maintained. The BTU output of any coil is in direct proportion to the amount of air going through the coil. If you decrease the CFM by 20%, you are also decrease the BTU’s by 20%!
  • Cleaning agents often corrode aluminum fins. Since every square inch of fin surface matters in performance, corrosion of the fin surface is always detrimental to the coil’s performance.
  • Many times, there are coil leaks simply because of old age. No coils are immune to erosion. You might find the brazing in the tubes, as well as the brazing in the header/tube connections failing over time. Steam can be both erosive and corrosive under higher pressures. Water travels through the coil at 2 – 5 ft/second, so erosion is an enormous part of coil failure, regardless of how well-maintained. Erosion is always there, whether you realize it or not.
  • Water/steam treatment and the corrosive effects of bad steam/water can all be causes of coil failure…which then necessitates the need for a reliable manufacturer for OEM replacement coils.

So What Is The Solution?

Some coils can last 5 years, and some coils can last 30 years. As you have read, there are numerous factors that contribute to a coil’s life. In the end, there will most likely have been multiple attempts to repair that coil to make it last as long as possible. The depressing news is that most of these “Band-Aid” attempts do not work well. The most likely outcome is that you are buying a new coil anyway, so why waste the time and money on a temporary solution?

Coil failure is a “pressure event”, which is a fancy way of saying that a coil is leaking. We’ve listed some of the most common repair methods that you are likely to come across:

  • Drop leaking tubes from the circuit: Keep in mind however that every dropped tube reduces the coil’s performance by triple the surface area of the tube that is dropped. Again, while ok in the short-term, this is simply another “Band-Aid” fix. Over time, your energy costs will rise exponentially, and you will probably end up buying a new coil anyway.
  • Braze over the existing braze: As mentioned above, erosion has caused the original braze to fail, so all that you are really doing is pushing the pressure to another braze, which will then begin to fail as well.
  • High Pressure Cleaning: This method bends the fins, further restricts the airflow, and pushes dirt more to the center of the coil, which can never be adequately cleaned.

The real reason why coils need to be replaced rather than repaired is due to energy costs. If your coil is not operating near desired levels, you’ll need to increase the energy to make it work at its peak performance. Energy increases might be slight at first, but they are guaranteed to continue to rise over time. For example:

  • Somebody adjusts the fan drive for higher speeds, higher CFM’s and higher BTU’s.
  • Someone adjusts the boiler; the water and steam temperatures are higher.
  • Someone adjusts the chiller (1) degree higher for colder water to the chilled water coil.

Whichever method is used, performance begins to suffer and adjustments to the system occur. These adjustments cost energy efficiency and ultimately, money!

If you have ever experienced repairing a coil, then you know it is labor intensive and typically will not work as a permanent solution. With very few exceptions, repairs should be seen as nothing more than temporary until you’re able to replace that coil!

Capital Coil & Air has seen every “repair” method used, as well its inevitable outcome, so instead of putting yourself through that, call Capital Coil and allow us to be your coil replacement experts.

RELATED POSTS

Is Your Quick-ship Shut Down When Needed Most??

Four Things That You Need When Buying Replacement Coils
Replacement HVAC Coils: 10 Common Ordering Mistakes

Top 5 Reasons HVAC Coils Prematurely Fail


Now Offering R-454B Refrigerant for All DX Coils

In keeping with most of the OEM’s in 2025, Capital Coil is helping everyone transition from R-410A over to R-454B refrigerant in their DX Coils. Whether you are designing a new system, or retrofitting an existing one with a condensing system, Capital Coil can help in making the switch in refrigerants.DX Coils

If you are not yet aware, the EPA is working hand in hand with many of the major OEM’s to help reduce commercial HVAC’s carbon footprint. One of the major ways in which HVAC manufacturers are helping and complying with the new industry standards is the gradual change in refrigerants from R-410A to R-454B. Beginning in January, 2025, no new system is allowed to be built or imported using the older refrigerants. Without going into a deep dive on the differences, R-454B offers a lower GWP (global warming potential) alternative to R-410A. Hence the mandate to change to that refrigerant type. 

However, Capital Coil will still offer R-22 and R-410A for DX Coils in older systems that might not be compatible with R-454B. In other words, Capital Coil has been, and will remain, the most reliable source for all commercial and OEM replacement coils. Our #1 job is to make to your job easier, so please reach out. You will be glad you did.

RELATED POSTS

What Does “Splitting” A DX (Evaporator) Coil Mean?

Condenser Coils Failing? Here’s probably why….

OEM Replacement Coils: Repair or Replace


What Does “Splitting” DX (Evaporator) Coils Mean

***Now Offering R-454B Refrigerant for All DX Coils

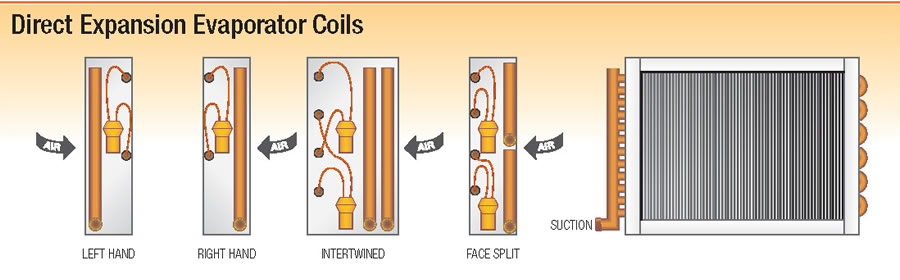
“Splitting” DX (Evaporator) coils is one of the toughest concepts to understand in the coil business. “Splitting” the coil simply means that (2) or more compressors can operate off of the same coil. One obvious advantage, or reason that you might “split” DX (Evaporator) coils is that you can shut down (1) of the compressors when the cooling load does not require it. This in turn saves energy, which saves $ when the cooling load is not operating at maximum design conditions. For example, let’s use a coil that is designed to give you (40) tons, but the coil is split so that (2) 20-ton compressors are feeding the same coil. If you only require ½ of the maximum load on any given day, you can shut down (1) compressor completely and operate the other one at 100%. This is a money-saving feature that you need to be aware of if you deal with DX coils on a regular basis. This requires special circuiting arrangements, and this is where the confusion starts with most folks. There are three primary ways to deal with this:DX (Evaporator) Coils

FACE SPLIT

Splitting the coil is nothing more than putting (2) completely separate fin/tube packs (coils) into one common casing. When you hear the term “face-splitting” a coil, you are drawing a horizontal line from left to right across the face of the coil and dividing the coil into a top and bottom half. It is like having two separate coils in one casing in that each half is circuited by itself. You hook up (1) compressor for the top half, and (1) compressor for the bottom.

In practice, this configuration is no longer used with much frequency because this arrangement leads to air being directed across the entire face of the coil. This disadvantage is especially apparent when only one half of the coil is in use because you’ll need a complicated damper/duct system to ensure that air is only directed to that portion of the coil in operation.

Row Split

“Row splitting” a coil is dividing the coil by drawing a line vertically and putting some portion of the total rows in (1) circuit, while putting the remaining rows in the other circuit. With this configuration, the air passes across the entire face of the coil, and will always pass across the rows that are in operation.

Please be aware that this configuration also comes with certain issues in that this kind of split makes it very hard to achieve a true 50/50 split. Let’s use an (8) row coil as an example. You would like to “row split” this coil with (4) rows/circuit, which would appear to be a perfect 50/50 split. The problem here is that the first (4) rows, located closest to the entering air, pick up a much higher portion of the load than the last (4) rows. In actuality, this coil’s split is closer to 66% / 34%, which will not match the 50/50 compressors. Another option is try to split the coil between (3) & (5) rows. While not 50/50 either, this configuration is closer. However, a new challenge arises because you have now created a coil that is very difficult to build and correctly circuit. In short, you need almost perfect conditions along with a degree of luck to achieve a true 50/50 split using this method.

Intertwined Circuiting

The most common to split coils today is to “intertwine” the circuiting. This means that every alternate tube in the coil is included in (1) circuit, while the other tubes are included in the (2nd) circuit. For example, tubes 1, 3,5,7,9, etc. in the first row are combined with tubes 2, 4, 6,8,10, etc. in the second row. The same tubes in succeeding rows form (1) circuit. You are essentially including every alternate tube in the entire coil into (1) circuit, which (1) compressor will operate. All of the remaining tubes not included in the first circuit will now encompass the second circuit.

The advantage of this configuration is that the air passes across the entire face of the coil, and, if one of the compressors is on, there are always tubes in operation. Every split is now exactly 50/50 because it cannot be any other way. Most DX coils are now configured in this manner due to these advantages.

Capital Coil has been, and will remain, the most reliable source for all commercial and OEM replacement coils. Our #1 job is to make to your job easier, so please reach out. You will be glad you did.


RELATED POSTS

CHILLED WATER, DX (EXPANSION) COILS & MOISTURE CARRYOVER

Now Offering R-454B Refrigerant for All DX Coils

DX & Chilled Water Cabinet Coils


Cooling Coils & Moisture Carryover

Moisture carryover is present on cooling coils where dehumidification happens.  Many people do not think it’s a problem…until you have moisture running down ductwork or spewing all over the inside of an air handler. If you’ve ever experienced that then you probably know all of these rules regarding moisture carryover.

  • Entering air temperatures of 80/67 of return air in the Northeast carry far less moisture than an outside 95/78 entering air temperature in Florida. Outside air always has more moisture.
    Cooling Coils

    -Your location plays a part as well. The drain pans will absolutely have be sized differently. Florida’s will be much larger in size.

  • Fin design is irrelevant when it comes to moisture carryover. Whether you have copper corrugated fins, or aluminum flat fins, plate fins or even the old fashioned spiral fins, none of it has any effect on moisture carryover.
  • Lastly, be careful when installing a new chilled water or DX (Evaporator) Coils in a system. Many end users like to increase the airflow on older coils because those old coils can act like filters, the fins are covered in dirt/dust and you’re not getting the same airflow through the coil. This dirt on the coil also semi-prevents moisture carryover. When that brand new chilled water coil is installed, the airflow might be higher than that of 550 ft/minute, which of course will cause moisture carryover problems. 

Please give us a call with any questions about your coil, your system or its design. Capital Coil is here to help you avoid situations like the one described in this post, and we would love for the chance to work with you!


RELATED POSTS

10 Things You Need to Know About Chilled Water Coils

Top 10 Chilled Water Coil Facts

Chilled Water Coil Circuiting Made Easy


Tips on Hand Designation & “Counter-flow”

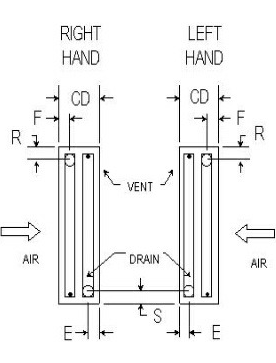
Are your chilled water coils right hand or left hand?  Are you looking into the face of the coil with the air hitting you in the back of the head?  What exactly is counter-flow and why is it important?  Are you completely confused by why right hand vs. left hand even exists?  Most manufacturers probably do not know or understand the technical reasons themselves.

First, let’s figure out what coils even need a hand determination.  Chilled Water Coils, Direct Expansion (Evaporator) Coils, and Condenser Coils are the only coils that need this figured on almost every job.  Hot Water Coils, Booster Coils, and Steam Coils rarely need this determination!  The reason for this is when the coils are only 1 or 2 rows deep, they can be flipped over.  When a chilled water coil is 3+ rows deep, hand determination is much more important because it needs to be counter-flow.  With most suppliers determining hand designation with the air hitting you in the back of the head….do you want the connections on the right or left?

Chilled Water CoilsYou’ve probably heard the term “counter-flow” countless times, but here’s the simplest explanation.  For peak performance, you want the air and the fluid traveling in opposite directions through the coil.  Is it the end of the world if your coils are not counter-flow?  The short answer is no, but you will lose approximately 5% of the output.  So if your coils are piped incorrectly, don’t expect to get the full performance, but they will still be more effective than whatever you’re replacing.  Steam and hot water coils are 1 or 2 rows deep, so again, counter-flow is pretty much irrelevant.  However, it can make a difference with any chilled water or direct expansion coils (3-12) rows deep.

We also get asked many times “what is the proper way to pipe coils?”  Put simply, steam coils should always be fed on the highest connection and the return on the lowest connection.  Water coils should always be fed on the lowest connection and returned on the top connection to ensure that all of the tubes are are fed the same volume of fluid. 

Hand designation and counter-flow are two pretty simple concepts when they are properly explained.  When dealing with a HVAC coil manufacturer, partner up with one who will walk you through the engineering and explain it along the way.  Capital Coil & Air has well over a decade of experience in handling pretty much any scenario that you may come across, so we want to be your coil resource for any and all projects. Please give us a try on your next job!

RELATED POSTS

Why are HVAC Coils Copper Tube and Aluminum Fin?

Did You Know? Facts about Commercial HVAC Coils

You should never have to worry about performance on replacement coils…Well, almost never!


Case Study: We Need These Coils on a (5) Day Quick-ship

In late June, Capital Coil received a call from a Trane office in Ohio regarding quick-ship availability. One of Trane’s top customers had an urgent need for (12) large chilled water coils with stainless steel casing. The problem/hurdle that they were encountering was that they needed all (12) coils to be built and ship out of the factory in (5) business days. Completion of the whole project was 100% contingent on them receiving the coils in their specified time-frame. An additional complication was the fact that July 4th was the following week, and they needed to have the coils ship prior to the holiday.

Trane shopped the project around to different manufacturers, but not one could guarantee to ship in (5) days. Some manufacturers waffled and claimed that they could have them built in (6) or (7) days, but not one could guarantee to ship in (5) days. A sales rep in that same Trane office, who had worked with Capital Coil previously, suggested that his co-worker reach out to us to see what we could do. After speaking with Trane’s project manager, we immediately contacted our head of production to make sure that we had the capacity to complete all (12) coils in the required (5) days. She assured us that we had the materials and manpower on-hand to get them all built and ship on time. We agreed to accept the project and began work on the coils immediately.

Due to the size of the project, as well as it’s time-sensitivity, we had multiple calls daily with our factory to ensure that everything was proceeding on schedule. We then gave Trane daily status updates, so they were constantly informed of everything from the brazing of the coils to entering the final testing phase. Chilled Water Coil

As promised, all (12) coils were built correctly and shipped out in the required (5) days. Our logistics team was then in constant communication with the freight company to make sure that the delivery was on schedule. And just like during the production phase, we passed daily tracking updates along to Trane, so they knew where their coils were at all times and when they could expect delivery. All (12) chilled water coils arrived on July 3rd with zero freight damage, and the project was completed on time!

A company as large and influential as Trane can have their coils built by anyone, but Capital Coil was the only manufacturer that could guarantee to have their coils built and shipped by a required date. Additionally, in working so closely with Trane throughout the whole process, they were kept up-to-date in real time from the start of production to final delivery.

Capital Coil offers a level of service that you won’t get with other manufacturers. When we guarantee to ship by a certain date, we stand by that guarantee, or you do not pay!


Trane’s project manager’s comments to Capital Coil upon completion/delivery:

“This will help us get a jump on this project prior to the big event taking place next week! 

I will make sure to share your information with others across our great lakes region about our experience with your company, so that they know we have THIS option to go to for our coil needs. THANK YOU ALL!!”


5 Work Day Quick-Ships on HVAC Coils – Why Capital Coil does it right

Day 1 – 38% of all orders sent to Capital Coil are on some kind of quick-ship, whether it be on a (5 day, 10 day, or 15 day). We enter the order immediately so that all departments in the plant have the project in their systems and are ready to move on it right away. The coil isQuick-Ships engineered, routing sheets are sent to the shop floor, and everybody now knows what needs to be built. 

Day 2 – Sheet metal casings are cut and sized, headers and connections are fabricated, while tube sheets are fabricated.

Day 3 – All tubing and fins are cut, stamped and assembly begins. You can see what the coil will look like upon final assembly at this point. Coils can be seen sitting on assembly tables.

Day 4 – Tubes are then expanded into the fins, and keep in mind that this is not a short process. Headers are then brazed to the tubes, and if there are return bends, they are connected. The coil is completely assembled and moved to the testing tank. The coil is tested under water for 20 minutes at 550 PSI. About 3% of coils have small leaks someplace in the brazing and are sent back to braze again.

Day 5 – The coil is crated and sent to shipping for routing to the customer. Then most importantly, your coil will be shipping in the guaranteed (5) days.

As you can see by this description, with quick-ships, there is not a lot of room for error in the timing and shipping with OEM HVAC replacement coils. We’ve been doing this for a while now, and we’ve had an approximately (97%) success rate fulfilling all quick-ship requests. We offer quick shipments 365 days per year, with both (10) day shipments & (15) day shipments also available for lower premiums.

diagram 

RELATED POSTS

Are Your Quick-Ships Shut Down When Needed Most???

How to make your HVAC OEM Replacement Coil Buying Process Easier??

OEM Replacement Coils: Repair or Replace???


Why Are Fin Designs On HVAC Replacement Coils Important?

Replacement HVAC Coils

At first glance, fin designs on HVAC replacement coils seem about as exciting as watching grass grow. “Why would I ever care about fin designs on any coil” was probably your initial response to our question. Nevertheless, we would not dedicate a newsletter to this subject if fins were not important.

One of the primary reasons fins are so important is that you want to keep your coil as clean and maintained as possible. In order to properly maintain your coil, you need to have an understanding as to how HVAC replacement coils are constructed. While fins do not look like much, they are MUCH more complicated than what you can observe at the entering or leaving airside of the coil.

To begin, fins are responsible for a surprising 65% – 70% of the heat transfer on any coil, while tubes are responsible for the remaining 30% – 35%. Additionally, in order for your coil to work at optimum performance, you need to have a terrific fin/tube bond, (which we will discuss below).

  1. Fins are known as secondary surface, while tubes are referred to as primary surface. While this may seem counter-intuitive, the secondary surface is responsible for twice the amount of heat transfer as the primary surface.
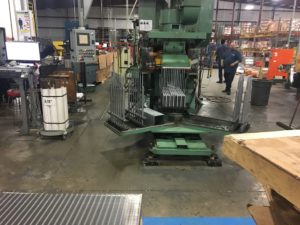
  2. There are special dies (see picture) that stamp out aluminum or copper fins with the correct thickness, height, and depth to make the coil the correct size. For example, a coil might be 36” (height) x 96” (length) x (8) rows deep x 8 fins/inch.
    1. Fin Height: 36”
    2. Fin Depth: 12”, (8) rows deep
    3. # of fins in the coil: 768 (8 fins x 96”)
  3. Each fin has 192 holes stamped in the fin for 5/8” OD tubes (8 Rows x 24 Tubes), and each fin is identical.
  4. Each hole has extruded metal, which is more commonly referred to as the fin collar. The collars are sized to self-space the fins and allow for later expansion of the tube into the fin collar. This practice is also known as “bonding” and is essential to having your coil run efficiently/correctly.
  5. Each fin is rippled at the entering and leaving edge of the fin to help create air turbulence.
  6. Each fin is corrugated in the direction of airflow to allow for greater air turbulence. This is important to remember because turbulence creates heat transfer.

So again, what is the point of understanding the importance of fins in HVAC coils? While coils can be built with flat fins for various reasons, the vast majority of coils are built with enhanced fins. Enhanced fins help to ensure that the airflow is not running straight through the coil.

Regardless of fin type, keep in mind that HVAC coils can and will act as great “filters”. The tubes are staggered and not in-line; while the fins are designed to help break up the airflow and not facilitate an easy, straight-through air path. Dirt and/or other particles in the air get caught easily, which again, is why coils can act as great filters. Additionally, coils with more rows will usually get dirtier than coils with less rows. Lastly, chilled water or DX coils are typically wet coils, which results in them catching virtually everything in the air.

The amount of BTU’s through any coil is in direct proportion to the amount of air through the coil. For example, if you are only getting 90% of the design air through the coil, then you are only getting 90% of the BTU’s.

Coils require good filtration and periodic maintenance. If not done correctly, you’ll pay the price of higher energy costs on an inefficient coil.

By now, you have hopefully come to the realization that HVAC coils are much more complicated than they appear, and that fins are an integral part of the coil as a whole. Again, while admittedly not the most exciting topic, understanding the role and importance of fins in HVAC coils cannot be overstated. Capital Coil & Air is here to help you with any and all coil selections, and we look forward to working with you on your next project.

RELATED POSTS

Repair or Replacement Coils?

Top 5 Reasons HVAC Coils Prematurely Fail

Are You Asking Your Coil Supplier These Questions?


Large enough to service all of your commercial replacement coils, but small enough to care about what you think

With replacement coils, as a customer, you have more choices than ever. But don’t you ever get tired of dealing with largely nameless corporations with high staff turn-over? As you’ve probably Replacement coilsexperienced first-hand, there are plenty of companies in the HVAC industry that fit this description. You are simply a number or a project instead of a customer/partner with a name and face. If given the alternative, would you rather deal with a company who knows you and is interested in your success, or a company who’s sole interest is finding out when your check is in the mail? Don’t you want somebody that values your business, regardless of the $ amount, and will go the “extra mile” for you when you need it? Capital Coil & Air places a great emphasis on those attributes in our business relationships, and common sense tells us that you probably do as well.

Capital Coil & Air was created as a family-owned business, with Matt and Dan Jacobs as joint owners and partners. What differentiates Capital Coil & Air from our competition is that we are big enough to handle all of your coil requirements, but still small enough to know who our customers are and what they need. We have decades worth of knowledge and expertise, and because of that, we have learned to not try to be all things to all customers. Capital Coil’s knowledge and experience is in the replacement and design/build market, and we are very disciplined at “staying in our lane”. Additionally, we’d much prefer to have customers and relationships that last years instead of one-off transactions. Working with Capital Coil is as simple and easy as it gets, and here are some examples:

  • When requesting a quote, we almost always respond within the same hour, or within 24 hours at the latest.  We recognize that there is an urgency to almost every coil order, and your time is valuable. In the end, a 3 day delay for a quote and/or revisions to said quote, is the same as if the manufacturer shipped your coil 3 days late.
  • When you place an order with us, we’ll send you an order acknowledgment within 24 hours detailing what you ordered, overall costs, and when it is going to ship.
  • We understand the value and necessity of clear communication. To minimize mistakes, we attach submittal drawings for every quote and order. We want to communicate with you throughout the entire buying process to make sure we are building exactly what you need.  More communication leads to less mistakes and wasted time.
  • We follow up on our shipments very carefully. We’ll work with both you and the carrier to help track your shipments to ensure your order gets to you the fastest way possible.
  • We will not ignore you simply because a sale is complete. Before, during and/or after installation, we’re here to answer your questions and help in any way possible.
  • If you need some help on pricing, we’ll do our best to work with you. While every job is unique, we want to work with you for the next 20 years, rather that a one and done purchase.

You now have some insight into our values and who we are at Capital Coil & Air. Please contact us for any future coil requirements. We greatly value your business and look forward to be your coil replacement partners on your next project!

RELATED POSTS

Top 10 Questions You SHOULD Be Asking Your Coil Supplier

Your Commercial HVAC Replacement Experts-Why Work With US?

Customers are a business’ top priority. So why is customer service such a challenge?

Quick, Reliable & Uncommonly Fast


Direct Expansion & Chilled Water Cabinet Coils

There are lots of ducted cooling applications with chilled water and/or DX (Evaporator) coils where you need to add incremental cooling to an existing system. However, there is an important difference when using heating coils. Because it’s a Cabinet Coilheating coil, there is no humidification occurring or water/condensate to draw. Due to these factors, cooling coils require a little more creativity and labor to install.

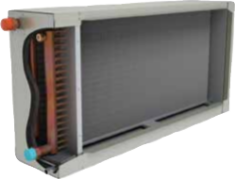
At Capital Coil & Air, we have removed all of the guesswork out of the application. Capital Coil manufactures Custom Coil Cabinet sections from as small as 12” x 12” sections to as large as 54” x 90” sections. We manufacture these units in both Chilled Water and DX (Expansion), as well as in 1/2” & 5/8” copper tube coils. You have the option to select anything from (3) rows to (8) rows. Additionally, we will custom-design the Cabinet around whichever site you select. Cabinet units include both insulation & drain pans, while the supports and casing allow you to connect directly to the ductwork. We can also add a Heating Coil inside the unit for more dehumidification if needed. Cabinet Coils are perfect for either heavy or light-duty installations.

All Cabinet Coils are available on Capital Coil’s Quick-Ship Program as well. As you are probably all-too-familiar, trying to custom design coils in the field is a pain. Using Cabinet Coils will greatly ease the whole installation process. Please see our Insulated Cabinet Coil Brochure for more details on available custom sizes.

Capital Coil & Air looks forward to the chance to your coil replacement specialists. Please give us a try on your next project!

RELATED POSTS

Chilled Water Coils & Moisture Carryover

New Product Offering: Insulated Cabinet Coils

Top 10 Chilled Water Coil Facts