Why Are HVAC Coils Made with Copper Tubes and Aluminum Fins?

HVAC Coils

It’s no coincidence that HVAC coils predominantly use copper tubes and aluminum fins. Copper is known to have exceptional heat transfer properties, while aluminum, although effective, does not match copper’s performance. When it comes to HVAC coils, the primary goal is either cooling or heating, which means heat transfer is a top priority. Right behind that? Cost. While copper is ideal for tubes due to its efficiency, using it for fins would be economically feasible only under specific circumstances. Consequently, the majority of HVAC coils are designed with copper tubes and aluminum fins, which provide an optimal balance of effective heat transfer and cost efficiency.

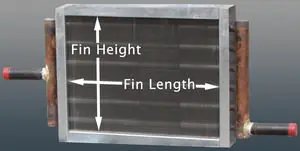
Fins play a crucial role in heat transfer, accounting for approximately 65% to 70% of the total heat exchange in any coil. The tubes contribute about 30% to 35%. To achieve optimal performance, it is essential to have a strong fin-tube bond. In HVAC terminology, fins are referred to as the “secondary surface,” while tubes are the “primary surface.” Interestingly, the secondary surface—aided by the expansive fin design—carries out twice the amount of heat transfer compared to the primary surface.

In the manufacturing process, the tubes are expanded into the fins, making the fins the secondary element. Given the fin density—typically at 8 to 10 fins per inch—here is significantly more surface area from the fins than from the tubes. This further highlights the importance of a robust fin-tube bond, as it is essential for the fins to perform effectively.

Understanding the materials used in HVAC coils is critical, and the reason copper and aluminum are the materials of choice for most coils is clear. Alternative tube materials such as aluminum, 304/316 stainless steel, and 90/10 cupro-nickel can be used, but none match the efficiency and cost effectiveness of the copper-aluminum combination.

At Capital Coil & Air, we are dedicated to assisting you with all your coil selection needs and look forward to collaborating on your next project.

RELATED POSTS

Why Is Fin Design On HVAC Coils Important?

Top 10 Tips to Measuring Coils

Did You Know? Facts about Commercial HVAC Coils

CATEGORY SUCCESS

Top 5 Reasons Commercial HVAC Coils Prematurely Fail

Capital Coil & Air has come across virtually every scenario over the years in which a commercial HVAC coil had to be prematurely replaced, and we have since created an easy guide targeting the main reasons HVAC Coils prematurely fail.

  • Coil Plugging: If you are not changing filters and/or your commercial HVAC coils are not properly cleaned in a timely manner, your coil will actually begin to act as a filter. When dirt builds up on the coil, that blockage prevents heat transfer and can cause an approximate 20% to 40% drop in performance. Dirt adds to the coil resistance and can be a primary cause for your coil to fail prematurely.
  • Vibration: When your HVAC coils are installed near a moving piece of equipment, vibration can occur and cause leaks. You can tell if vibration is the main cause if leaks are near the tube sheet and look like they are slicing through the tube. If/when that happens, the coils should be isolated from the rest of the system to prevent vibration from causing damage. One way to combat this is by oversizing the tubesheet holes, but many manufacturers will not do this. Condenser Coils are usually the most common victims of vibration.
  • Corrosive Environment: This applies to both the air in the environment and inside the tubes. For instance, if there is a corrosive element in the air, it will eat away at the copper tubes; whether you have 0.020” wall or 0.049” wall. This is very common in coastal areas where there may be salt in the air. To keep the costs down from going to a stainless steel or cupro-nickel coil, we usually suggest coating the HVAC coils. Coatings are almost always within your budget, and its application will only add about a week to the overall lead time. Steam condensate and untreated water can cause corrosion within the tubes of HVAC coils as well. If you have a steam coil that has failed before the one year warranty, there’s a great chance that corrosive agents are in the steam, and it’s eating away at the copper tubes.
  • Freeze-Ups: Most people think that when HVAC coils freeze, the water or condensate laying in the coil freezes into ice and it expands causing the tubes to bulge and eventually spring leaks. What really happens is that the coil will freeze in multiple areas simultaneously, and it’s the pressure between these areas that cause the tubes to swell and eventually burst. These are very easy to spot as the leaks will run the length of the tube rather than around the tube.  ALSO be very careful when considering “freeze-proof” coils!  If you remove 5-6 inches from the fin length to make the “freeze-proof” application fit, your coil’s performance will suffer considerably. 
  • System Design: You would be amazed to learn how many HVAC coils were never designed properly for their systems. If there is a design problem, replacing the coil will only waste time and money; while you have done nothing other than duplicate the previous problem. A little known fact in the replacement market is that a high percentage of all our projects are because the coils were built incorrectly or were never designed correctly in the first place. In some cases, owners attempt to improve the coil’s performance by adding additional rows. Most however do this without taking into account the air pressure drop or fluid pressure drop that comes with it.

When dealing with an HVAC coil manufacturer, try to partner up with one who will walk you through the engineering and explain it along the way. Capital Coil & Air has well over a decade of experience and can help you diagnose whatever problem that you are experiencing correctly the first time. We look forward to working with you on your next project!

RELATED POSTS

Four Things That You Need When Buying Replacement Coils

Replacement HVAC Coils: 10 Common Ordering Mistakes

Coil Costs: What Will Make Your HVAC Coils More Expensive?

CATEGORY SUCCESS

Top 10 Tips For Measuring HVAC Coils

1. When measuring HVAC coils, performance has very little to do with accurately measuring for replacement coils. Fitting the coil in the existing space with the least amount of labor has everything to do with measuring a coil.  If you duplicate the coil in almost every respect, the performance will match and take care of itself.  New is always more efficient than old.

2.  If you’re ever in doubt about a dimension, smaller is always better than bigger. You can always “safe off” around any coil as long as you can fit it in the space.  If a coil is too big, it makes a really ugly coffee table in your shop.  Too big is the enemy of measuring coils.

Chilled Water Coil

3.  The fin height and fin length are not the determining factors in measuring a coil. The overall casing dimensions are the most important, and you work backwards to determine fin dimensions.

4.  The depth of any coil is the total casing depth in the direction of airflow. The height is the number of tubes high in any row.  Depth is a function of rows deep and height is a function of tubes in a row.

5.  Overall length (OAL) is not the fin length and it’s not the casing length. It is the length from the return bends to include the headers that are inside the unit.  Again, it is necessary to work backwards to get the other dimensions once you know this critical dimension.

6.  Circuiting is the number of tubes connected to the supply header. Generally, you just want to count the number of tubes connected to the header and that will tell you whether it’s full, half, or even a double circuit.  It does not matter how the return bends are configured.  Your goal is to count the number of supply tubes and all performance is based on that.

7.  Fins are measured in fins per inch. Hold a tape measure up to the coils and count the number of fins in one inch.  If you can’t get in to take the measurement, a safe rule of thumb is 10-12 fins/inch.  That will work on almost every coil.  The exception to that rule is a condenser coil.  14-16 fins/inch on a condenser coil is usually pretty safe.

8.  Connection locations are difficult only if you are using the existing piping in the system (which are welded). Copper piping is brazed and can be changed easily.  If a system is old and the piping is being replaced as well as the coil, the connection location is not a major deal.  It’s very easy to match up!

9.  With replacement coils, the concept of “left hand vs. right hand” doesn’t actually exist. Connections are “top left-bottom right” or vice versa.  Ideally, all coils should be counter-flow which means that the water and air flow in opposite directions.  The air hits row one first and the water is piped into row eight first.  However, there are lots of installations that are piped backwards, and they work just fine.  Just match them up, and the coil’s performance will be equal to the old coil.

10.  Connections are not measured from the top of the header! They are measured from the top of the casing to the centerline of the connection.  Or the bottom of the casing to the centerline.  You need a point of reference, and the header height can be anything just as long as it doesn’t stick above or below the casing height.


All of the above “suggestions” or “secrets” are in no particular order.  They are just things that you should know to ensure that you are selecting the correct replacement coil. While most seem like common sense, your best bet is to talk with the sales team at Capital Coil & Air, who can walk your through the entire process and help you to fill out coil drawings when trying to measure the dimensions.

RELATED POSTS

Replacement HVAC Coils: 10 Common Ordering Mistakes

The Smart Approach to Buying HVAC Coils (and Saving Money)

Top 10 Chilled Water Coil Facts

CATEGORY SUCCESS

OEM Replacement Coils: Repair or Replace

When considering OEM replacement coils, there are multiple reasons why coils can fail prematurely. Sometimes, OEM Coils simply freeze and can never be repaired. Other times, the coil was selected incorrectly, which in turn, made the coil significantly underperform. Many times, there is substantial corrosion or something else in the system that causes the coil to fail. However, most coils, when selected correctly, and in systems that are properly maintained, can last anywhere from 10-30 years!  10-30 years is also a pretty wide range, and there are many variables in how long you can expect a coil to perform. Factors, such as ongoing maintenance, air quality, and water/steam quality all have an effect on a coil’s lifespan.

OEM Replacement Coils

Reasons Why Coils Fail Of Old Age

  • While the coil’s tubes are considered the primary surface, 70% of all coil performance is performed by the finned area on a coil, which is known as the secondary surface. The fin/tube bond is easily the most important manufacturing feature in any coil. Without the bond between the tubes and fins, the coil could never properly function. Like all things however, over time the fin/tube bond becomes less efficient with constant expansion and contraction. While the construction of the coil, as well as the fin collars, does not allow the fins on the coil to move, that fin/tube bond naturally weakens a coil’s life over time after installation. Because of this, it is not a stretch to say that a coil is easily 30% less efficient after (20) years.
  • Cleaning coils often pushes dirt to the center of the coil, and this occurs even more so on wet cooling coils. Just remember that coils can become great air filters if not properly maintained. The BTU output of any coil is in direct proportion to the amount of air going through the coil. If you decrease the CFM by 20%, you are also decrease the BTU’s by 20%!
  • Cleaning agents often corrode aluminum fins. Since every square inch of fin surface matters in performance, corrosion of the fin surface is always detrimental to the coil’s performance.
  • Many times, there are coil leaks simply because of old age. No coils are immune to erosion. You might find the brazing in the tubes, as well as the brazing in the header/tube connections failing over time. Steam can be both erosive and corrosive under higher pressures. Water travels through the coil at 2 – 5 ft/second, so erosion is an enormous part of coil failure, regardless of how well-maintained. Erosion is always there, whether you realize it or not.
  • Water/steam treatment and the corrosive effects of bad steam/water can all be causes of coil failure…which then necessitates the need for a reliable manufacturer for OEM replacement coils.

So What Is The Solution?

Some coils can last 5 years, and some coils can last 30 years. As you have read, there are numerous factors that contribute to a coil’s life. In the end, there will most likely have been multiple attempts to repair that coil to make it last as long as possible. The depressing news is that most of these “Band-Aid” attempts do not work well. The most likely outcome is that you are buying a new coil anyway, so why waste the time and money on a temporary solution?

Coil failure is a “pressure event”, which is a fancy way of saying that a coil is leaking. We’ve listed some of the most common repair methods that you are likely to come across:

  • Drop leaking tubes from the circuit: Keep in mind however that every dropped tube reduces the coil’s performance by triple the surface area of the tube that is dropped. Again, while ok in the short-term, this is simply another “Band-Aid” fix. Over time, your energy costs will rise exponentially, and you will probably end up buying a new coil anyway.
  • Braze over the existing braze: As mentioned above, erosion has caused the original braze to fail, so all that you are really doing is pushing the pressure to another braze, which will then begin to fail as well.
  • High Pressure Cleaning: This method bends the fins, further restricts the airflow, and pushes dirt more to the center of the coil, which can never be adequately cleaned.

The real reason why coils need to be replaced rather than repaired is due to energy costs. If your coil is not operating near desired levels, you’ll need to increase the energy to make it work at its peak performance. Energy increases might be slight at first, but they are guaranteed to continue to rise over time. For example:

  • Somebody adjusts the fan drive for higher speeds, higher CFM’s and higher BTU’s.
  • Someone adjusts the boiler; the water and steam temperatures are higher.
  • Someone adjusts the chiller (1) degree higher for colder water to the chilled water coil.

Whichever method is used, performance begins to suffer and adjustments to the system occur. These adjustments cost energy efficiency and ultimately, money!

If you have ever experienced repairing a coil, then you know it is labor intensive and typically will not work as a permanent solution. With very few exceptions, repairs should be seen as nothing more than temporary until you’re able to replace that coil!

Capital Coil & Air has seen every “repair” method used, as well its inevitable outcome, so instead of putting yourself through that, call Capital Coil and allow us to be your coil replacement experts.

RELATED POSTS

Is Your Quick-ship Shut Down When Needed Most??

Four Things That You Need When Buying Replacement Coils

Replacement HVAC Coils: 10 Common Ordering Mistakes

Top 5 Reasons HVAC Coils Prematurely Fail

CATEGORY SUCCESS

Four Things To Know When Buying Replacement Coils

While building numerous types of coils for various customers over the years, we’ve discovered the four main things that you need when replacing HVAC coils. We’ve found that most customers are searching for many of the same things, and also share many of the same priorities. Based on numerous conversations with our customers, we’ve compiled a list of the primary factors that you need to consider when purchasing an HVAC coil.

  • Marketing and advertising experts’ claim that a person needs to see and/or hear something an average of 3-5 times for the brain to really absorb the message. And so, in light of that claim, think DELIVERY, DELIVERY, DELIVERY, and DELIVERY! Every coil job has a degree of urgency to it, which is why the speed of delivery is so significant. Either you are beginning the process of replacing coils for a system that is shut Quick-Shipdown, or you are in the middle of a job and discover that you need coils to be delivered as soon as possible. In either scenario, you need a coil supplier that works on your schedule – not their own, independent timetable. Capital Coil’s Quick Ship Program allows the coils to be built on your timeline, not the manufacturer’s.
  • The coil MUST fit in the space allowed! You can purchase the highest quality coil ever manufactured, and if it does not fit, then you have nothing more than exquisitely manufactured scrap metal. So when measuring a coil, always remember that a little smaller is always better than a little bigger. There are 100 different ways to make a smaller coil work for you. On the flip-side, if a coil is too big, then you have no choice but to start over.
  • Performance matters! As with any purchase, it’s important to have an idea of what you are trying to accomplish. The simple act of duplicating a coil can sometimes work, but more often than not, additional performance information is needed. This is precisely where Capital Coil & Air can help. We’ll work with you to come up with a simulated performance schedule, even if you do not have all of the necessary information. Working in consultation with our clients tends to lead to an outcome that is acceptable to all parties.
  • Lastly and very importantly, there is cost. Everyone has budgetary constraints, and no one wants to break the bank paying for coils. However, buying a coil is often more than simply price alone. Taking into account required delivery times, sizing of the coils for the job, performance, and price, buying a coil can be a balancing act. While price should not be minimized, buying the cheapest coil is seldom the best coil for your job or application. The adage “you get what you pay for” certainly applies when it comes to coils. Capital Coil’s main goal is to help lessen your overall price, without sacrificing performance and quality.
 
 Performance options, size options, and shipment options will help you to spend your money in the most effective way possible. Capital Coil’s job is to give you the options and information that will allow you to make the best decision in your buying process. Your success is our success, so our goal is to have an on-going, consultative relationship that works for both parties. Call us on your next job, we’d love the chance to earn your business.
 

RELATED POSTS

Replacement HVAC Coils: 10 Common Ordering Mistakes

Coil Costs: What will make your HVAC coil more expensive?

Stock Hot Water Coils – Quick Buyers Guide

CATEGORY SUCCESS

Does Your HVAC Coil Selection Program Leave You With More Questions Than Answers?

At Capital Coil & Air, we have an accurate and user-friendly coil selection program to select and choose coils. Of course, making good selections is based on having years of experience working with coils of all types and sizes, and Coil Selection Programwe at Capital Coil have that necessary expertise.

When designing a coil, the object is to balance cost and performance together, and that is one area in which we can greatly assist. We do not always choose the cheapest coil because the cheapest coil in almost never the best coil. There are always pressure drops, materials of construction, performance requirements and a host of other things that all play into good or bad coil selections. These are even more relevant in the coil replacement market!

The object is not to duplicate a problem with a coil, but to instead solve the problem and make the coil perform better and last longer. This requires problem solving and making selections that are not always “in the box”.

Part of any successful selection process is having a good selection program to help you. But what makes a program good? First and foremost, you must get the correct results, or you have bad information that is also useless. But apart from that, the selection program must be easy to navigate through. There are “red lights” and “stop signs” built into the program to keep you from making bad selections. Our selection program has most, if not all, coil configurations and styles that you’re likely to run across. We are confident that you’ll find the selection program user-friendly, helpful, and one that makes you want to do business with Capital Coil & Air.

You simply have to click here to request the program, and we will send you an email in response with an activation code and a link to download the program. Of course we are always here to assist you in any selections that you make, or to give you some engineering suggestions and recommendations. Thanks for giving us the opportunity to help you!

RELATED POSTS

10 THINGS THAT YOU DON’T KNOW ABOUT CAPITAL COIL & AIR

10 Things You Need to Know to Buy Replacement Coils Effectively

Repair or Replacement Coils?

CATEGORY SUCCESS

Stock Hot Water Coil – Quick Buyers Guide

Hot Water Coils

Depending on the specific project, selecting the appropriate Hot Water Coil can go one of two ways:  1) costly and complicated or 2) cheap and rather straight-forward. If you’re a representative or contractor reading this, you understand this fact all too well. And if you’ve dealt with us, you know that we much prefer going the second route rather than the first.  Considering the complexity of other types of coils, hot water coils should be as easy for to purchase and get delivered as they are for the manufacturer to build and keep in stock. So…why is it so hard to get your hot water coils shipped to where you need them when you need them?

Capital Coil & Air decided to create a quick buyers guide to when selecting and purchasing Stock Booster Coil Replacements :

  • First and foremost, you need to determine whether the booster coil needs to be 1 or 2 rows deep. Keep in mind that a 2 row booster coil will always generate substantially more BTU’s than a 1 row booster coil, but will also cause your air pressure drop to rise.
  • Generally speaking, booster coils are primarily installed someplace in the ductwork. If your duct size doesn’t match exactly with what we can build a good rule of thumb is to request your coils be built slightly larger than the ducts where they are going to be installed.
  • Booster coils are offered in sizes anywhere from 6” x 6” to 30” X 72”. Booster coils are 1 or 2 row coils that are available in 60 sizes.  Flanged or Slip & Drive casings are available on every size to meet your needs.
  • While most manufacturers claim they have “booster coils in stock”, and then ship in a week, we actually have (30) sizes in stock ready to ship the next day!

Whether you need (1) hot water coil or (200) hot water coils, Capital Coil & Air has the most competitive pricing in the business with the best lead times. Please see our Booster Coil Product Page. Most companies don’t want to bother with hot water coils.  No one does hot water coils better than Capital Coil & Air!

Related Topics

Stock Hot Water Booster Coils

Booster Coil Basics

Booster Coil FAQ’s

CATEGORY SUCCESS