What Does “Splitting” A DX (Evaporator) Coil Mean?

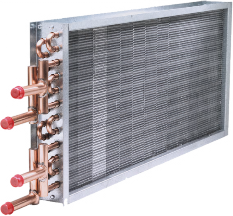
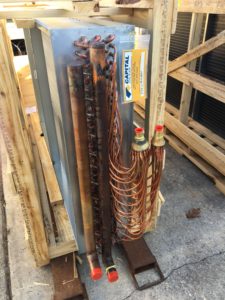
“Splitting” a DX (Evaporator) coil is one of the toughest concepts to understand in the coil business. “Splitting” the coil simply means that (2) compressors can operate off of the same coil. One obvious advantage, or reason that you might “split” a DX (Evaporator) coil is that you can shut down (1) of the compressors when the cooling load does not require it. This in turn saves energy, which saves $ when the cooling load is not operating at maximum design conditions. For example, let’s use a coil that is designed to give you (40) tons, but the coil is split so that (2) 20-ton compressors are feeding the same coil. If you only require ½ of the maximum load on any given day, you can shut down (1) compressor completely and operate the other one at 100%. This is a money-saving feature that you need to be aware of if you deal with DX coils on a regular basis. This requires special circuiting arrangements, and this is where the confusion starts with most folks. There are three primary ways to deal with this:

FACE SPLIT

Splitting the coil is nothing more than putting (2) completely separate fin/tube packs (coils) into one common casing. When you hear the term “face-splitting” a coil, you are drawing a horizontal line from left to right across the face of the coil and dividing the coil into a top and bottom half. It is like having two separate coils in one casing in that each half is circuited by itself. You hook up (1) compressor for the top half, and (1) compressor for the bottom.

In practice, this configuration is no longer used with much frequency because this arrangement leads to air being directed across the entire face of the coil. This disadvantage is especially apparent when only one half of the coil is in use because you’ll need a complicated damper/duct system to ensure that air is only directed to that portion of the coil in operation.

Row Split

“Row splitting” a coil is dividing the coil by drawing a line vertically and putting some portion of the total rows in (1) circuit, while putting the remaining rows in the other circuit. With this configuration, the air passes across the entire face of the coil, and will always pass across the rows that are in operation.

Please be aware that this configuration also comes with certain issues in that this kind of split makes it very hard to achieve a true 50/50 split. Let’s use an (8) row coil as an example. You would like to “row split” this coil with (4) rows/circuit, which would appear to be a perfect 50/50 split. The problem here is that the first (4) rows, located closest to the entering air, pick up a much higher portion of the load than the last (4) rows. In actuality, this coil’s split is closer to 66% / 34%, which will not match the 50/50 compressors. Another option is try to split the coil between (3) & (5) rows. While not 50/50 either, this configuration is closer. However, a new challenge arises because you have now created a coil that is very difficult to build and correctly circuit. In short, you need almost perfect conditions along with a degree of luck to achieve a true 50/50 split using this method.

Intertwined Circuiting

The most common to split coils today is to “intertwine” the circuiting. This means that every alternate tube in the coil is included in (1) circuit, while the other tubes are included in the (2nd) circuit. For example, tubes 1, 3,5,7,9, etc. in the first row are combined with tubes 2, 4, 6,8,10, etc. in the second row. The same tubes in succeeding rows form (1) circuit. You are essentially including every alternate tube in the entire coil into (1) circuit, which (1) compressoDX (Evaporator) Coils
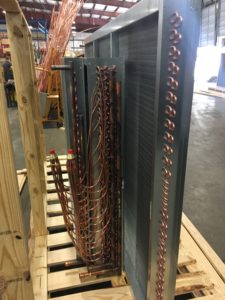
r will operate. All of the remaining tubes not included in the first circuit will now encompass the second circuit.

The advantage of this configuration is that the air passes across the entire face of the coil, and, if one of the compressors is on, there are always tubes in operation. Every split is now exactly 50/50 because it cannot be any other way. Most DX coils are now configured in this manner due to these advantages.

Capital Coil & Air has years of experience measuring, designing and building almost every OEM DX coil that you’ll come across, so please let us help you on your next project. We want to be your replacement coil experts and look forward to the opportunity.


RELATED POSTS

CHILLED WATER, DX (EXPANSION) COILS & MOISTURE CARRYOVER

Different Types of Steam Coils?

DX & Chilled Water Cabinet Coils


Condenser Coils Failing? Here’s probably why….

Did you recently turn on your DX systems only to find your Condenser Coils are not working?  Simple fix right?  Unfortunately, no.  If you get lucky, you can send us the model number of the unit, and there’s a great chance we’ve already built it.  In the case that we do not have that model number on file, you have two options.  You can go back to the OEM, wait (5) months for a part and pay through the roof.  Or you call Capital Coil, and we’ll walk you through the engineering it takes to replace a condenser coil.                                                                      Condenser Coils

Very rarely do condenser coils ever freeze so the first thing you’re going to want to know is if your coil died of corrosion, old age, or possibly vibration.  Old age is obviously preferable because with a few easy dimensions, we’ll have enough to price up your duplicate coil.  Condenser coils are usually outside and are easily accessible for measurements and digital pictures.  With just the size, the rows, and fins/inch, you can get a price.  And digital pictures of the headers and return bends will give us a good idea of the circuiting and sub-cooler circuits. 

If the coil has been eaten away by corrosion, it was an improper design to begin with.  Most people don’t know that salt in the air will ruin aluminum fins within a year or two.  There are two ways to combat this.  The first option is to make the switch to copper fins and stainless steel casings.  While this will extend the life of your coil considerably, most people are not too happy about the additional cost over aluminum fins.  The second option is to use a coating.  Coatings are the much more popular choice.  They are a fraction of the cost as copper fins and only add (1 – 2) weeks to your lead time. 

When your HVAC coils are installed near a moving piece of equipment, vibration can occur and cause leaks.  The area where these leaks occur is very important and will clue you in to if the problem is vibration.  If they are near the tube sheet and look like they are slicing through the tube, the coils should be isolated from the rest of the system to prevent vibration from causing damage.  One way to combat this is by oversizing the tubesheet holes, but many manufacturers will not do this.  Condenser coils are usually the most common victims of vibration.

The last concern is with cleaning condenser coils.  Since condenser coils see outside air almost exclusively, they need to be cleaned more than other coils.  The reason for this is most condenser coils have fin spacing of 12-20 fins/inch.  With fins that tight together, the coil can and will act like a filter.  And when the coil is clogged up, the performance suffers greatly.  Recently, we’ve been getting more and more calls about using a heavier fin thickness.  This is to help with high pressure cleaning and corrosive cleaning agents. 

When dealing with an HVAC coil manufacturer, partner up with one who will walk you through the engineering and explain it along the way. Capital Coil & Air has well over a decade of experience and has seen every issue to make sure your everything from the quote to the installation go smoothly! Give us a try on your next project!

RELATED POSTS

Top 5 Reasons HVAC Coils Prematurely Fail

You should never have to worry about performance on replacement coils. Well… almost never!

Repair or Replacement HVAC Coils?


Coils and Counter-flow: 5 Common Questions

1)  Coils and counter-flow?

The first thing to remember about coils and counter-flow is that chilled water coils are always built to be piped in counter-flow. This means that the air flows in the opposite direction as the water. For example, with counter-flow, the air flows through rows 1-8, while the water runs through rows 8-1. Water always travels through the coil in the opposite direction of the air; hence the term “counter-flow.”  Direct Expansion Coils (Evaporator Coils) are also piped in the same manner.

With that said, what happens when you do not pipe cooling coils counter-flow? Almost all coil selection programs you will see or use will be based on counter-flow conditions. If you opt to not counter-flow a chilled water coil, you’ll have to reduce the coil’s overall performance by a certain percentage. That percentage reduction varies based on each coil’s unique dimensions, but a reliable estimate is a loss of 8-12%. Simply piping the coils in the correct manner from the beginning would seem to be the easiest and most cost-effective solution.

2)  Why do you feed from the bottom of the coil?

DX Coils

You always want to feed a water coil from the bottom connection so that the header fills from the bottom on up and feeds every tube connection evenly. All tubes must be fed evenly with the same amount of water. If you try to feed the header from the top, you greatly increase the risk of “short circuiting” the coil and having a higher water flow through the top tubes in the coil.

3)  What is a Water Hammer in a Steam Coil?

On a long Steam Coil, you will be hard pressed to get the steam through the length of the coil. Slowly but surely, that steam converts into condensate, which is pretty much the worst thing that can happen to any system. If not evacuated, the condensate just lays in the coil when the system is shut off. This problem comes into play when the steam is turned back on and meets the condensate laying inside the coil. In addition to the noise, the steam and condensate cause huge amounts of additional stress on the coil’s joints. As a result, over time, your coil will inevitably fail.

4)  What else happens if you do not evacuate condensate?

When you cannot or do not evacuate the condensate on long steam coils, the condensate ends up blocking the steam. A steam coil should never feel cool to the touch, but when condensate blocks steam, one part of the coil will be warm while the other will be cool. Again, that should not happen. Steam coils are interesting in that they are more dependent upon the system and installation than any other type of coil. A steam coil must be pitched to the return end of the coil. Obviously, steam is not water. Traps, vacuum breakers and other steam accessories must be installed and located properly for the system to function.

5)  Is it necessary to pipe steam and/or hot water coils in counter-flow?

Simply put – no! Circuiting a coil is only necessary to ensure the connections are on the side of the coil that you want. The rows and tubes in the coil dictate how and where you feed, but the steam supply always needs to be the high connection. This method ensures that the leaving condensate is on the bottom of the coil and below the lowest tube within the coil. Whatever else you do, know that the condensate must leave the coil!

If you have any questions or need assistance with ordering and/or installation, please contact a sales engineer at Capital Coil & Air. We will walk with you step-by-step through your entire project should you require any assistance. CALL OR E-MAIL US!  We look forward to the opportunity to work with you on your future projects.


RELATED POSTS

Tips on Hand Designation & Counter-flow

Chilled Water Coils & Moisture Carryover

Chilled Water Coil Circuiting Made Easy