Top 10 Hints for Replacing Tube Bundles in U-Tube Exchangers
by Dan Jacobs, October 30, 2023
There are basically three kinds of shell and tube heat exchangers:
- “U” Tube heat exchangers where it is possible to remove the entire bundle
- Fixed tube heat exchangers where the tube sheet are welded to the shell and stationary and the bundle is not removable
- Floating tube heat exchangers where one tube sheet is fixed and the other floats axially. This tube bundle is also removable.
- The shell for this type of shell & tube exchanger can/will last just about forever. However, the copper tube bundles located inside will often need to be replaced. The idea here is to slide the old bundle out and replace it with a new bundle, using the least amount of labor possible.
- One very important question to ask is which types of tube bundles are replaceable? “U” tube bundles and straight tube bundles with “floating tube sheets” can be replaced, while fixed tube sheet bundles must be re-tubed rather than replaced.
- Replacing a bundle is pretty straightforward and easy. Simply slide the bundle out and measure the overall length (including the tubesheet). Keep in mind that the bundle’s OAL will always be several inches shorter than the shell’s OAL.
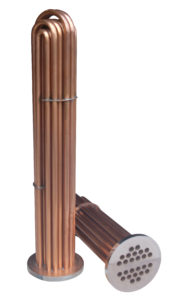
- The next step is to determine the size of the tubes in the bundle. While the vast majority of bundles have ¾” OD tubes, it is possible to have ½” OD, 5/8” OD, or 1” OD.
- Next, decide on the tube thickness that you need. Thicker tubes will last longer, but will obviously be more expensive. Typically ¾” tubes will have a .049” wall thickness, but you can easily upgrade if needed.
- Including tube supports or baffles, the number of tubes in the bundle should always be the maximum number that you can fit inside the shell. If you are not sure of the # of tubes, contact us, and Capital Coil can tell you the maximum number.
- You also want to make sure to count the tube supports or baffles on the length of the shell. While tube supports only serve to keep the bundle together, baffles actually direct the fluid on the shell side to go back & forth across the bundle. If you are unsure which is which, tube supports run the complete circumference of the bundle, while baffles are generally staggered and look to cover only a portion of the tubes.
- The only real way to not get the bundle correct is if the tubesheet is not duplicated correctly. First, measure the thickness of the tubesheet. ¾”, 1”, 1 ½” are examples that you’re likely to see.
- Next, you want to determine the number of bolt holes, as well as the center to center distance of the bolt holes. Doing this basically determines the bolt hole pattern. The bolts are responsible for connecting the head and the tube bundle to the shell, so they all must match up exactly! But, please also keep in mind that it is possible to have no bolts in the tubesheet as the bolts then bypass around the tubesheet.
- Lastly, every bundle has a number of passes that create fluid which runs through the tubes. That fluid will ultimately end up back at the same end. (2) pass, (4) pass, or (6) pass are among the most common. Gasketing and head design determine the number of passes.
Replacing a bundle is pretty easy, and it should take you approximately 15 minutes to gather all of the necessary information. But if you happen to run into any difficulties, please call us here at Capital Coil & Air, and we’ll help walk you through everything. We have the capability to build almost any kind of bundle of various construction types and different tube materials. Please give us a try on your next project as we want to be your go-to resource for all bundle replacements.
RELATED POSTS
Replacing a Shell and Tube Heat Exchanger? And Have the Model Number?
Need A Replacement Heat Exchanger/Tube Bundle?
Did You Know? Shell & Tube Heat Exchanger FAQ
Tags: Heat Exchanger, Replacement Heat Exchanger, Replacement Tube Bundle, Tube Bundle