10 Things To Know About Chilled Water Coils

Chilled Water Coil

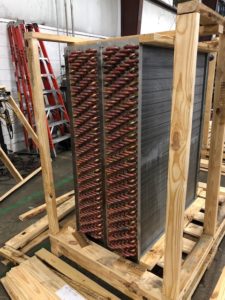
1. Hot or chilled water coils are still water coils. There is really no difference between hot water coils and a chilled water coils in construction. Hot water coils are usually 1 or 2 rows and chilled water coils are usually 3 to 12 rows deep.

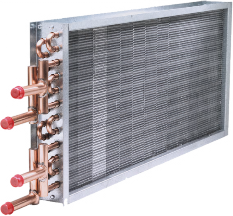
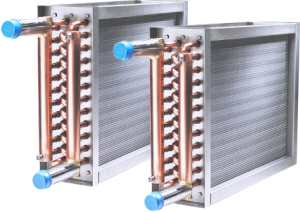
2. The vast majority of chilled water coils are constructed from either 1/2″ OD tubes or 5/8″ OD tubes. A lot of that depends on the tooling of the original equipment manufacturer and what is more economical. Either size can be used and substituted for each other, which makes replacing your coil that much easier.

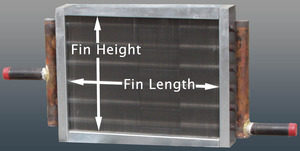
3. 1/2″ Tubes are on 1.25″ center to center distance. 5/8″ tubes are on 1.5″ center to center distance. For example, if a chilled water coil has a 30″ fin height, there will be (24) 1/2″ tubes per row or (20) 5/8″ tubes per row. The tube area of the coil is remarkably the same. They are almost interchangeable.

4. The quality of the coil often times is directly tied to the tube thickness. Many installations have water not treated properly or tube velocities that are too high. There are few perfect installations in real life. Increasing the tube wall thickness on a chilled water coil is a great way to ensure longer life.

5. Fins make great filters! Of course, they are not designed to be filters, but it happens. You can make any coil cheaper by making them 14 fins/inch with less rows rather than 8 or 10 fins/inch. Just remember that deep coils are very difficult to clean. Cheap is not the way to go most of the time!

6. Fins are designed for maximum heat transfer. They are much more complicated in design than they appear to be when looking at the chilled water coil. They are rippled on the edge to break up the air. They are corrugated throughout the depth of the fin. The tubes are staggered from row to row and the fin collars are extended. All of this to maximize heat transfer. Unfortunately, the byproduct of this is the fins can end up being great filters. Be careful in the design of any chilled water coil.

7. Fins are aluminum for a reason! They give you great heat transfer at an economical cost. You need a compelling reason to switch to copper fins as copper is very expensive, and you’re likely to double (or maybe triple) the cost of the coil. Coatings are popular for this very reason.

8. Many chilled water coils are built with 304 stainless steel casings. The casings are stronger, they last longer, they are stackable, and it’s fairly inexpensive. After all, what is the point of building the best coil possible and have the casing disintegrate over time around the coil? Sometimes, it’s money well spent!

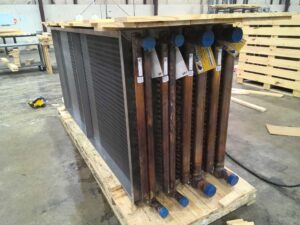
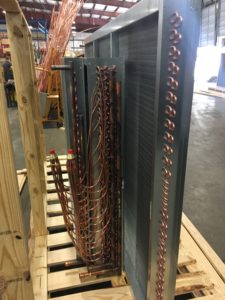
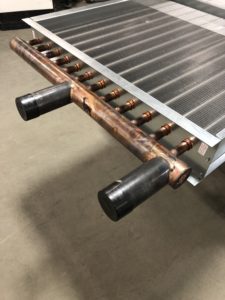
9. Circuiting the coil is the tricky part of any coil. Circuiting is nothing more than the number of tubes that you want to feed from a header. There are two rules. You must keep the water velocity over 1 foot/second and below 6 feet/second. 3-4 feet/second is optimum. The second is the number of tubes that you feed must divide evenly into the number of tubes in the coil.

10. Replacing  your chilled water coil is easy. Rarely do you have to worry about the performance. When you replace a 20 year old coil, it is dirty and the fin/tube bond is not good. The coil is probably operating at 1/2 of its capacity at best. When you put a new coil on the job, your performance will automatically be terrific. Your main concern is now making the sure the coil physically fits in the space allowed. And always have this in the back of your mind: Smaller is always better than too large. Smaller you can always work with, whereas too large makes for a very ugly and expensive coffee table.

There you have it – everything you need to know about chilled water coils. Interested in learning more, please reach out to Capital Coil & Air! We look forward to the opportunity to be your coil replacement specialists!

RELATED POSTS

DX & Chilled Water Cabinet Coils

Coils and Counter-flow: 5 Common Questions

Top 5 Reasons HVAC Coils Prematurely Fail


Guidelines For Air Velocities

The height, length and resulting air velocities greatly figure in everything in determining the size and performance of a coil. Step # 1 in determining the size and performance of a coil is dependent upon understanding face & air velocities of air across the coil. Whether you use CCA’s coil selection program to help size the coil, or you are replacing an existing coil; the height, length and resulting velocity determine everything.

Hot Water Booster Coils

air velocities

Every coil has a specific, optimum velocity, so you want to make sure you are within 30% (+ or -) of that number. For example, booster coils have an optimum velocity of 800 ft/minute. That means that you can drop your velocity to 600 ft/minute, or conversely, increase the velocity to 1,000 ft/minute. The duct velocities are almost always higher, which means that you will need to transition to a larger coil. Try to get to as close to 800 ft/minute as possible, while sizing your coil to make the transition as easy as possible. Everything with coils is a balancing act.

Hot Water & Steam Coils

Like booster coils, hot water and steam coils should also have face velocities at approximately 800 ft./minute. Both steam & hot water coils have only sensible heating, which is why their face velocities can be the same. Face velocities ultimately control the coil’s cost, so 800 ft./minute really is a heating coil’s “sweet spot”.

If you are purchasing an air handler unit, oftentimes the heating coil is smaller than the cooling coil because the face velocities on heating coils can exceed those of cooling coils. Due to water carry-over, cooling coils cannot exceed 550 ft/minute, while heating coils only deal with sensible heat.

Chilled Water & DX Coils

Due to the limited face velocities of cooling coils, your choices are more limited. With cooling coils, your face velocity must be somewhere between 500 ft./minute-550 ft./minute. Remember that when dealing with cooling coils, you are dealing with both sensible and latent cooling, so the coil is wet. When you exceed 550 ft./minute, water carry-over occurs past the drain pans.

If you are purchasing an air handler unit, you probably will not have worry about the coil’s face velocity as most coils come pre-sized at the acceptable face velocities. Fan coils also come pre-sized with the correct CFM’s. However, if you are replacing an existing cooling coil, the face velocity must remain at or below 550 ft/minute!!

 Air Stratification Across The Coil

Air does not travel equally across the face of a coil. If you were to divide a coil into (9) equal sections, like a tic-tac-toe board, you would see a high percentage of air travelling through the center square, rather than the corner squares. In a perfect air flow scheme, 11% of the air would travel through each of the 9 squares, but that is not what happens. Because more air travels through the center of the coil, you want to avoid putting a fan too near the coil. Due to central air flows, most systems are draw-thru, rather than blow-thru. This is also why you want to avoid installing your coil near any 90 degree angles/turns in the ductwork. Avoid any situations that contribute more than the “natural” air stratification to help ensure your coil is at maximum efficiency.

In some situations involving cooling coils, you will have water carry-over even when the coil is sized correctly. How can this happen? Think about the tic-tac-toe board again. Air velocities are exceeding 700 ft./minute in the coil’s center, while the corners are around 300 ft./minute. This cannot and will not work.

Coils do not have any moving parts. They simply react to the air across the outside of the coil and whatever is running through the inside of the coil. Coils are 100% a function of your entire system, as well as the installation in general.

Capital Coil & Air is here to help with any coil selections that will help avoid costly missteps that lead to wasted time and money. Call us on your next project, we greatly look forward to working with you!

RELATED POSTS

Chilled Water, DX (Expansion) Coils & Moisture Carryover

Tips on Hand Designation & Counter-flow

Coils and Counter-flow: 5 Common Questions


Why Are Fin Designs On HVAC Replacement Coils Important?

Replacement HVAC Coils

At first glance, fin designs on HVAC replacement coils seem about as exciting as watching grass grow. “Why would I ever care about fin designs on any coil” was probably your initial response to our question. Nevertheless, we would not dedicate a newsletter to this subject if fins were not important.

One of the primary reasons fins are so important is that you want to keep your coil as clean and maintained as possible. In order to properly maintain your coil, you need to have an understanding as to how HVAC replacement coils are constructed. While fins do not look like much, they are MUCH more complicated than what you can observe at the entering or leaving airside of the coil.

To begin, fins are responsible for a surprising 65% – 70% of the heat transfer on any coil, while tubes are responsible for the remaining 30% – 35%. Additionally, in order for your coil to work at optimum performance, you need to have a terrific fin/tube bond, (which we will discuss below).

  1. Fins are known as secondary surface, while tubes are referred to as primary surface. While this may seem counter-intuitive, the secondary surface is responsible for twice the amount of heat transfer as the primary surface.
  2. There are special dies (see picture) that stamp out aluminum or copper fins with the correct thickness, height, and depth to make the coil the correct size. For example, a coil might be 36” (height) x 96” (length) x (8) rows deep x 8 fins/inch.
    1. Fin Height: 36”
    2. Fin Depth: 12”, (8) rows deep
    3. # of fins in the coil: 768 (8 fins x 96”)
  3. Each fin has 192 holes stamped in the fin for 5/8” OD tubes (8 Rows x 24 Tubes), and each fin is identical.
  4. Each hole has extruded metal, which is more commonly referred to as the fin collar. The collars are sized to self-space the fins and allow for later expansion of the tube into the fin collar. This practice is also known as “bonding” and is essential to having your coil run efficiently/correctly.
  5. Each fin is rippled at the entering and leaving edge of the fin to help create air turbulence.
  6. Each fin is corrugated in the direction of airflow to allow for greater air turbulence. This is important to remember because turbulence creates heat transfer.

So again, what is the point of understanding the importance of fins in HVAC coils? While coils can be built with flat fins for various reasons, the vast majority of coils are built with enhanced fins. Enhanced fins help to ensure that the airflow is not running straight through the coil.

Regardless of fin type, keep in mind that HVAC coils can and will act as great “filters”. The tubes are staggered and not in-line; while the fins are designed to help break up the airflow and not facilitate an easy, straight-through air path. Dirt and/or other particles in the air get caught easily, which again, is why coils can act as great filters. Additionally, coils with more rows will usually get dirtier than coils with less rows. Lastly, chilled water or DX coils are typically wet coils, which results in them catching virtually everything in the air.

The amount of BTU’s through any coil is in direct proportion to the amount of air through the coil. For example, if you are only getting 90% of the design air through the coil, then you are only getting 90% of the BTU’s.

Coils require good filtration and periodic maintenance. If not done correctly, you’ll pay the price of higher energy costs on an inefficient coil.

By now, you have hopefully come to the realization that HVAC coils are much more complicated than they appear, and that fins are an integral part of the coil as a whole. Again, while admittedly not the most exciting topic, understanding the role and importance of fins in HVAC coils cannot be overstated. Capital Coil & Air is here to help you with any and all coil selections, and we look forward to working with you on your next project.

RELATED POSTS

Repair or Replacement Coils?

Top 5 Reasons HVAC Coils Prematurely Fail

Are You Asking Your Coil Supplier These Questions?


Condenser Coils Failing? Here’s probably why….

Did you recently turn on your DX systems only to find your Condenser Coils are not working?  Simple fix right?  Unfortunately, no.  If you get lucky, you can send us the model number of the unit, and there’s a great chance we’ve already built it.  In the case that we do not have that model number on file, you have two options.  You can go back to the OEM and wait (5) months for a part while paying through the roof.  Or you call Capital Coil, and we’ll walk you through the engineering it takes to replace a condenser coil.                                                                      Condenser Coil

Very rarely do condenser coils ever freeze so the first thing you’re going to want to know is if your coil died of corrosion, old age, or possibly vibration.  Old age is obviously preferable because with a few easy dimensions, we’ll have enough to price up your duplicate coil.  Condenser coils are usually outside and are easily accessible for measurements and digital pictures.  With just the size, the rows, and fins/inch, you can get a price.  And digital pictures of the headers and return bends will give us a good idea of the circuiting and sub-cooler circuits. 

If the coil has been eaten away by corrosion, it was an improper design to begin with.  Most people don’t know that salt in the air will ruin aluminum fins within a year or two.  There are two ways to combat this.  The first option is to make the switch to copper fins and stainless steel casings.  While this will extend the life of your coil considerably, most people are not too happy about the additional cost over aluminum fins.  The second option is to use a coating.  Coatings are the much more popular choice.  They are a fraction of the cost as copper fins and only add one week to your lead time. 

When your HVAC coils are installed near a moving piece of equipment, vibration can occur and cause leaks.  The area where these leaks occur is very important and will clue you in to if the problem is vibration.  If they are near the tube sheet and look like they are slicing through the tube, the coils should be isolated from the rest of the system to prevent vibration from causing damage.  One way to combat this is by oversizing the tubesheet holes, but many manufacturers will not do this.  Condenser coils are usually the most common victims of vibration.

The last concern is with cleaning condenser coils.  Since condenser coils see outside air almost exclusively, they need to be cleaned more than other coils.  The reason for this is most condenser coils have fin spacing of 12-20 fins/inch.  With fins that tight together, the coil can and will act like a filter.  And when the coil is clogged up, the performance suffers greatly.  Recently, we’ve been getting more and more calls about using a heavier fin thickness.  This is to help with high pressure cleaning and corrosive cleaning agents. 

When dealing with an HVAC coil manufacturer, partner up with one who will walk you through the engineering and explain it along the way. Capital Coil & Air has well over a decade of experience and has seen every issue to make sure your everything from the quote to the installation go smoothly! Give us a try on your next project!

RELATED POSTS

Top 5 Reasons HVAC Coils Prematurely Fail

You should never have to worry about performance on replacement coils. Well… almost never!

Repair or Replacement HVAC Coils?


Tips on Hand Designation & “Counter-flow”

Are your chilled water coils right hand or left hand?  Are you looking into the face of the coil with the air hitting you in the back of the head?  What exactly is counter-flow and why is it important?  Are you completely confused by why right hand vs. left hand even exists?  Most manufacturers probably do not know or understand the technical reasons themselves.

First, let’s figure out what coils even need a hand determination.  Chilled Water Coils, Direct Expansion (Evaporator) Coils, and Condenser Coils are the only coils that need this figured on almost every job.  Hot Water Coils, Booster Coils, and Steam Coils rarely need this determination!  The reason for this is when the coils are only 1 or 2 rows deep, they can be flipped over.  When a chilled water coil is 3+ rows deep, hand determination is much more important because it needs to be counter-flow.  With most suppliers determining hand designation with the air hitting you in the back of the head….do you want the connections on the right or left?

Chilled Water CoilsYou’ve probably heard the term “counter-flow” countless times, but here’s the simplest explanation.  For peak performance, you want the air and the fluid traveling in opposite directions through the coil.  Is it the end of the world if your coils are not counter-flow?  The short answer is no, but you will lose anywhere from 12-15% of the output.  So if your coils are piped incorrectly, don’t expect to get the full performance.  Steam and hot water coils are 1 or 2 rows deep, so again, counter-flow is pretty much irrelevant.  However, it can make a BIG difference with any chilled water or direct expansion coils (3-12) rows deep.

We also get asked many times “what is the proper way to pipe coils?”  Put simply, steam coils should always be fed on the highest connection and the return on the lowest connection.  Water coils should always be fed on the lowest connection and returned on the top connection to ensure that all of the tubes are are fed the same volume of fluid. 

Hand designation and counter-flow are two pretty simple concepts when they are properly explained.  When dealing with a HVAC coil manufacturer, partner up with one who will walk you through the engineering and explain it along the way.  Capital Coil & Air has well over a decade of experience in handling pretty much any scenario that you may come across, so we want to be your coil resource for any and all projects. Please give us a try on your next job!

RELATED POSTS

Why are HVAC Coils Copper Tube and Aluminum Fin?

Did You Know? Facts about Commercial HVAC Coils

You should never have to worry about performance on replacement coils…Well, almost never!


What Does “Splitting” A DX (Evaporator) Coil Mean?

“Splitting” a DX (Evaporator) coil is one of the toughest concepts to understand in the coil business. “Splitting” the coil simply means that (2) compressors can operate off of the same coil. One obvious advantage, or reason that you might “split” a DX (Evaporator) coil is that you can shut down (1) of the compressors when the cooling load does not require it. This in turn saves energy, which saves $ when the cooling load is not operating at maximum design conditions. For example, let’s use a coil that is designed to give you (40) tons, but the coil is split so that (2) 20-ton compressors are feeding the same coil. If you only require ½ of the maximum load on any given day, you can shut down (1) compressor completely and operate the other one at 100%. This is a money-saving feature that you need to be aware of if you deal with DX coils on a regular basis. This requires special circuiting arrangements, and this is where the confusion starts with most folks. There are three primary ways to deal with this:

FACE SPLIT

Splitting the coil is nothing more than putting (2) completely separate fin/tube packs (coils) into one common casing. When you hear the term “face-splitting” a coil, you are drawing a horizontal line from left to right across the face of the coil and dividing the coil into a top and bottom half. It is like having two separate coils in one casing in that each half is circuited by itself. You hook up (1) compressor for the top half, and (1) compressor for the bottom.

In practice, this configuration is no longer used with much frequency because this arrangement leads to air being directed across the entire face of the coil. This disadvantage is especially apparent when only one half of the coil is in use because you’ll need a complicated damper/duct system to ensure that air is only directed to that portion of the coil in operation.

Row Split

“Row splitting” a coil is dividing the coil by drawing a line vertically and putting some portion of the total rows in (1) circuit, while putting the remaining rows in the other circuit. With this configuration, the air passes across the entire face of the coil, and will always pass across the rows that are in operation.

Please be aware that this configuration also comes with certain issues in that this kind of split makes it very hard to achieve a true 50/50 split. Let’s use an (8) row coil as an example. You would like to “row split” this coil with (4) rows/circuit, which would appear to be a perfect 50/50 split. The problem here is that the first (4) rows, located closest to the entering air, pick up a much higher portion of the load than the last (4) rows. In actuality, this coil’s split is closer to 66% / 34%, which will not match the 50/50 compressors. Another option is try to split the coil between (3) & (5) rows. While not 50/50 either, this configuration is closer. However, a new challenge arises because you have now created a coil that is very difficult to build and correctly circuit. In short, you need almost perfect conditions along with a degree of luck to achieve a true 50/50 split using this method.

Intertwined Circuiting

The most common to split coils today is to “intertwine” the circuiting. This means that every alternate tube in the coil is included in (1) circuit, while the other tubes are included in the (2nd) circuit. For example, tubes 1, 3,5,7,9, etc. in the first row are combined with tubes 2, 4, 6,8,10, etc. in the second row. The same tubes in succeeding rows form (1) circuit. You are essentially including every alternate tube in the entire coil into (1) circuit, which (1) compressoDX (Evaporator) Coilsr will operate. All of the remaining tubes not included in the first circuit will now encompass the second circuit.

The advantage of this configuration is that the air passes across the entire face of the coil, and, if one of the compressors is on, there are always tubes in operation. Every split is now exactly 50/50 because it cannot be any other way. Most DX coils are now configured in this manner due to these advantages.

Capital Coil & Air has years of experience measuring, designing and building almost every OEM DX coil that you’ll come across, so please let us help you on your next project. We want to be your replacement coil experts and look forward to the opportunity.


RELATED POSTS

CHILLED WATER, DX (EXPANSION) COILS & MOISTURE CARRYOVER

Different Types of Steam Coils?

DX & Chilled Water Cabinet Coils


Cooling Coils & Moisture Carryover

Moisture carryover is present on cooling coils where dehumidification happens.  Many people do not think it’s a problem…until you have moisture running down ductwork or spewing all over the inside of an air handler. If you’ve ever experienced that then you probably know all of these rules regarding moisture carryover.

  • Entering air temperatures of 80/67 of return air in the Northeast carry far less moisture than an outside 95/78 entering air temperature in Florida. Outside air always has more moisture.
    Cooling Coils

    -Your location plays a part as well. The drain pans will absolutely have be sized differently. Florida’s will be much larger in size.

  • Fin design is irrelevant when it comes to moisture carryover. Whether you have copper corrugated fins, or aluminum flat fins, plate fins or even the old fashioned spiral fins, none of it has any effect on moisture carryover.
  • Lastly, be careful when installing a new chilled water or DX (Evaporator) Coils in a system. Many end users like to increase the airflow on older coils because those old coils can act like filters, the fins are covered in dirt/dust and you’re not getting the same airflow through the coil. This dirt on the coil also semi-prevents moisture carryover. When that brand new chilled water coil is installed, the airflow might be higher than that of 550 ft/minute, which of course will cause moisture carryover problems. 

Please give us a call with any questions about your coil, your system or its design. Capital Coil is here to help you avoid situations like the one described in this post, and we would love for the chance to work with you!


RELATED POSTS

10 Things You Need to Know About Chilled Water Coils

Top 10 Chilled Water Coil Facts

Chilled Water Coil Circuiting Made Easy


Are Your Quick-Ships Shut Down When Needed Most???

Why are quick-ships so important??

Christmas season is in full-swing, and your current coil supplier has suspended all Quick-Ships with little to zero notice to its customers. Does that sound familiar these days? Additionally, the clock is ticking to complete those projects that need to be done by the end of the year. In this industry, this scenario is when “Quick-Ship” availability is an absolute must. Right now, the vast majority of coil manufacturers are scrambling to complete standard orders on regular lead-times, and if by dumb-luck they are able to temporarily offer any type of expedited build, the added premiums are so astronomical that very few customers can afford to use those options.

If you need a new coil, your first inclination will probably be to call the OEM. But more times than not, they are not flexible or nimble enough to handle your emergency within an acceptable time-frame. Quick-ships are generally based on emergency conditions, and that is precisely the worst time to discover that your regular supplier has suspended Quick-Ships.

So why do so many manufacturers seem to get so overwhelmed at various point every year? In short, many manufacturers take on a glut of OEM business, or other large projects with small profit margins. In many cases they do this simply to keep the factory running during the slower periods of the year. This has the effect of delaying standard lead times, and in many cases, cancelling Quick-Ships altogether. It is very hard to do business with companies that make themselves unavailable when you need them the most.

Capital Coil’s primary duty as the leading OEM replacement coil manufacturer is to fill in those gaps and work with you to help alleviate any emergencies. Whether you need a coil in (3) weeks, or (5) days, Capital Coil has got you covered.

Capital Coil does not try to be all things to all customers, and we’re most comfortable “staying in our lane”. Our #1 goal is to ensure that we have multiple quick-ship options open all year around…even if that means turning away an order to ensure sure that our Quick-Ships are ALWAYS available!!  Quick-ships

Because Quick-Ships make up such a substantial portion of our overall business, Capital Coil has hit 99.9% of our quick-ship requests over the last (2) years. An unfortunate forklift mistake makes up the other .1%. Throughout the first 6 months of 2022, approximately 80% of all orders were/are quick-ships, and they have either all been completed on time, or are 100% on schedule.

An RFQ that sits on a desk unanswered is useless to everyone involved. If you need a quote, you’ll have your price and any required submittals that same day. It really is that simple and easy! Working with Capital Coil will remove many, if not all of the annoying and unannounced shut-downs that come with other manufacturers, so please let us help you when you need it the most!


RELATED POSTS

Uncertain About Recent Changes In The HVAC Industry?

Repair or Replace Your HVAC Coils?

10 Things You Need to Know to Buy Replacement Coils Effectively


Top 10 Chilled Water Coil Facts

Every Chilled Water Coil selection is about balance. Your coil selection balances the rows/fins versus the cost of the coil pressure drops/performance. Trying to cut corners on your initial selection may save you money upfront, but you will inevitably pay it back down the line through added energy costs. This is a truism for every manufactured coil.

  1. Fins cost less money than rows/tubes. A good cost-cutting tool when selecting a coil is to choose 14 fins/inch. This will turn your (8) row coil into a (6) row coil, which will dramatically lower your costs. If you choose to go this route, one thing to keep in mind is that 14 fins/inch will be semi-inconvenient to any maintenance crew tasked with cleaning the coil. Don’t expect a Christmas card from them that year.
  2. That raises the question of whether or not you can even clean a deep (6) or (8) row coil? In short, you can, but it is not easy. Chilled water coils are especially difficult to clean because they are almost always wet. Due to this fact, they typically attract dirt and additional particles that other coils do not. Generally, when cleaning a coil, most of the dirt get pushed to the middle, and for that reason, 14 fins/inch may not be the best idea after all.

    Chilled Water Coils

  3. Did you know that fins do approximately 70% of the heat transfer in a chilled water coil, while the tubes are only responsible for the remaining 30%? This is precisely why the fin/tube bond is so important. Without a perfectly crafted fin/tube bond, coils become inefficient very quickly. You pay for that inefficiency through increased energy costs.
  4. How long does a coil last? At what age can I expect my coil to fail? Unfortunately, there is no single answer to either question. Everything is dependent on a combination of maintenance, duty, and numerous other factors. If your initial selection was correctly chosen, and proper maintenance was kept, 15-20 years is a good timeframe.
  5. You may have a situation where your coil is 20 years old, and everything appears to be operating in good condition. There are no leaks and all looks ok. However, over that length of time, what you don’t see is that the fins have thinned and are no longer bonded to the tubes, and the coil is dirty in places that you cannot see. Again, while the coil may look to be running in top form, it’s probably only running at 60% capacity. Most likely, the tubes have also thinned over time, so when the next deep freeze occurs, you can guess the likely outcome.
  6. You really need to replace the coil, but have been told to make do with the current coil? To make up for the lack of efficiency, you might try to “jury-rig” your system. One method is to change the drive on the fans to deliver more CFM. This increases the air pressure drop, which in turn increases motor brake horsepower. Another option to help increase the coil’s efficiency is to lower the temperature of the chilled water from the chiller. We tend to mess with the system and apply temporary Band-Aids, when replacing the coil is the only guaranteed long-term solution.
  7. If you want to spend money wisely on a chilled water coil, simply make the tubes thicker. The tube thickness for a 5/8” tube coil is .020” thick, so increase the tube thickness to .025”. The same applies for a ½” tube coil, with a tube thickness of .016”. Increase it to .020”. By doing this, you get the added bonus of making your return bends thicker, which also helps to extend the life of the coil.
  8. Not quite sure about circuiting on a chilled water coil? You are going to have a hard time making an accurate selection unless you understand how to circuit a coil. Circuiting is really nothing more than selecting the number of tubes that you want to feed, and how many passes the water makes through the coil – depending on your GPM. Circuiting is one of the most important factors in ensuring that your coil is running at peak-performance.
  9. Curious about the balance between cost, size, materials, and maintenance? Every chilled water coil needs to be maintained for its entire life-span. If you’ve made your selection, and something seems off about the coils, chances are mistakes were made during the selection process. Some indicators include the coil being too big for the space allowed, or incurring out of control energy costs. What is the point of saving $500 on a chilled water coil if you have to spend $5,000 in maintenance over its life-span?

As coil replacement experts, we run into this issue every day. Our goal is to work with you to ensure your selections are correct the first time. The person in charge of budgets will be grateful to you over time. Capital Coil & Air welcomes the opportunity to work with you on your next coil project! We want to be your coil replacement specialists.

 RELATED POSTS

Chilled Water Coil Circuiting Made Easy

Chilled Water Coils & Moisture Carryover

Top 10 Things You Need to Know About Chilled Water Coils


Top 10 Tips For Measuring HVAC Coils

1. When measuring HVAC coils, performance has very little to do with accurately measuring for replacement coils. Fitting the coil in the existing space with the least amount of labor has everything to do with measuring a coil.  If you duplicate the coil in almost every respect, the performance will match and take care of itself.  New is always more efficient than old.

2.  If you’re ever in doubt about a dimension, smaller is always better than bigger. You can always “safe off” around any coil as long as you can fit it in the space.  If a coil is too big, it makes a really ugly coffee table in your shop.  Too big is the enemy of measuring coils.

Chilled Water Coil

3.  The fin height and fin length are not the determining factors in measuring a coil. The overall casing dimensions are the most important, and you work backwards to determine fin dimensions.

4.  The depth of any coil is the total casing depth in the direction of airflow. The height is the number of tubes high in any row.  Depth is a function of rows deep and height is a function of tubes in a row.

5.  Overall length (OAL) is not the fin length and it’s not the casing length. It is the length from the return bends to include the headers that are inside the unit.  Again, it is necessary to work backwards to get the other dimensions once you know this critical dimension.

6.  Circuiting is the number of tubes connected to the supply header. Generally, you just want to count the number of tubes connected to the header and that will tell you whether it’s full, half, or even a double circuit.  It does not matter how the return bends are configured.  Your goal is to count the number of supply tubes and all performance is based on that.

7.  Fins are measured in fins per inch. Hold a tape measure up to the coils and count the number of fins in one inch.  If you can’t get in to take the measurement, a safe rule of thumb is 10-12 fins/inch.  That will work on almost every coil.  The exception to that rule is a condenser coil.  14-16 fins/inch on a condenser coil is usually pretty safe.

8.  Connection locations are difficult only if you are using the existing piping in the system (which are welded). Copper piping is brazed and can be changed easily.  If a system is old and the piping is being replaced as well as the coil, the connection location is not a major deal.  It’s very easy to match up!

9.  With replacement coils, the concept of “left hand vs. right hand” doesn’t actually exist. Connections are “top left-bottom right” or vice versa.  Ideally, all coils should be counter-flow which means that the water and air flow in opposite directions.  The air hits row one first and the water is piped into row eight first.  However, there are lots of installations that are piped backwards, and they work just fine.  Just match them up, and the coil’s performance will be equal to the old coil.

10.  Connections are not measured from the top of the header! They are measured from the top of the casing to the centerline of the connection.  Or the bottom of the casing to the centerline.  You need a point of reference, and the header height can be anything just as long as it doesn’t stick above or below the casing height.


All of the above “suggestions” or “secrets” are in no particular order.  They are just things that you should know to ensure that you are selecting the correct replacement coil. While most seem like common sense, your best bet is to talk with the sales team at Capital Coil & Air, who can walk your through the entire process and help you to fill out coil drawings when trying to measure the dimensions.

RELATED POSTS

Replacement HVAC Coils: 10 Common Ordering Mistakes

The Smart Approach to Buying HVAC Coils (and Saving Money)

Top 10 Chilled Water Coil Facts